Connecting to Textastic with Windows Explorer
Learn how to connect to the builtin WebDAV server using Explorer on Windows.
Requirements

Your Windows PC must be connected to the same network as your iPad running Textastic.
Textastic currently supports Windows Vista and Windows 7. If you need to connect from older versions of Windows (like XP), please use a third party client like BitKindex or Total Commander with WebDAV-Plugin.
The iPad must be connected via Wi-Fi.
It is recommended that all Vista users install this WebDAV/Web Folders update from Microsoft. (This is not required on Windows 7)
Make sure the WebDAV server is started
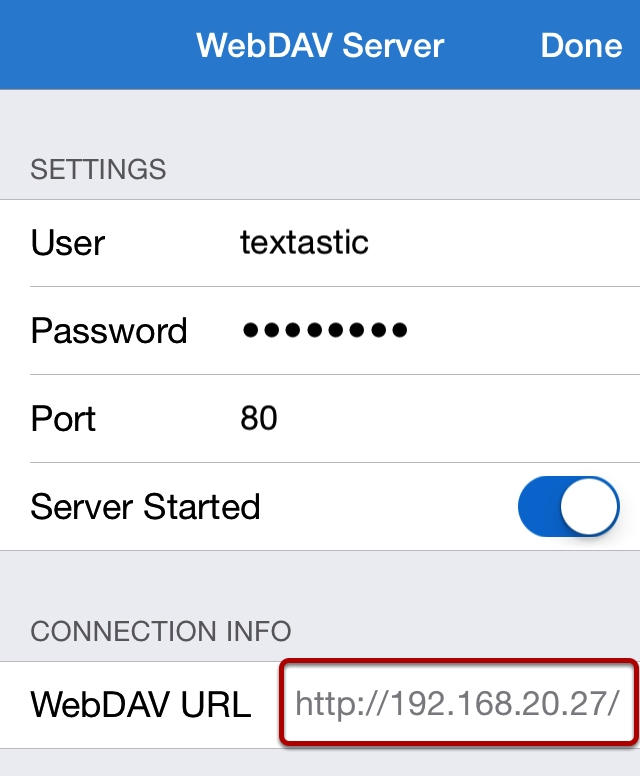
Start the WebDAV server and note the WebDAV url.
Connect from Windows Vista / Windows 7
Windows Vista/Windows 7 users have two options for connecting to the Textastic WebDAV server: You can either map a network drive to the Files server, or create a network location. Both methods are described below.
1) Map a Network Drive
1. Open Computer from the Start Menu.
2. Click on the Map Network Drive button in the toolbar.
3. Enter the Textasic WebDAV URL into the Folder field.
4. Click the blue link “Connect using a different username” to enter your username and password.
5. Click Finish to create the new drive letter.
This will map Files to a network drive with a name such as: "DAVWWWRoot (\\192.168.63.176@80) Y:"
To reconnect in future just open this network drive from Computer.
Note: If you change your username or password you may need to re-create the Network drive to gain access to Files.
2) Create a Network Location
1. Open Computer from the Start Menu.
2. Click on the Map Network Drive toolbar item.
3. In the Map Network Drive window, click Connect to a Web site that you can use to store your documents and pictures, click Next.
4. Select Choose a custom network location, click Next.
5. In the Internet or network address field, enter the Textastic WebDAV URL
6. You will be prompted for your username and password.
7. Enter a name for the connection and click Next.
8. Ensure that Open this network location when I click Finish is checked and click Finish.
In the future you can connect simply by opening "My Network Places" and double-clicking the network location you created. You may need to select "Refresh" from the window's context-menu to ensure that Windows has an up-to-date view of your files and folders.
Note: If you change your username or password you may need to re-create the Network location to gain access to Files.